Thursday, March 29, 2007

Does Peanut Brittle Count as Dinner?

Well, before I get to the pictures, a little background. A little over a month ago two middle schoolers showed up at the front door selling overpriced candy for their middle school orchestra. Normally I would say no, as that isn't a cause I'm overly concerned about. But, it was one of those days I was feeling extra nice, and they had peanut brittle, which reminded me of growing up, as my neighbor Mary would make it each Christmas. Well, it just happens that my candy got delivered today! Perfect timing, as a few pieces here and there have turned into dinner. Not sure my mom and dad would be too proud :), but I gotta get the bathroom ready before my brother arrives on Thursday! So, now that you have listened to my random story about peanut brittle, onto some pictures.

First the dogs...they really aren't liking this remodeling side of me, as I get home from work and go straight to work.

Here's Gizmo waiting at the top of the stairs...

...while General hangs out on the sofa giving me dirty looks as I made my trips up and down the stairs to dump out the dirty water in the backyard.


Grout! I didn't think I would notice such a difference, but I must say, it looks really good!

The floor still needs one final wipe down. And don't worry, that edge around the perimeter of the room and the corners of the shower will get filled with caulk. As I explained to Geoffrey earlier, the corners and edges are expansion joints. If I were to grout them as opposed to caulking, I would surely have cracked tiles in no time at all.

Well, seems there is an "Office" marathon tonight on NBC. I have just enough time to clean up the final layer of haze on the tiles, jump in the shower and then spend some quality time with Geoffrey and the pugs before heading off to bed. Stay tuned for major updates this weekend, as the vanity, toilet and baseboards get installed!

Sunday, March 25, 2007

Floor is done!

The bathroom floor was completed on Saturday afternoon. I painted the bathroom earlier in the week, but you really can't tell from the pictures. Guess that is what happens when you pick a neutral color. The walls were painted in Behr's "Smoked Oyster" Kitchen and Bath paint. I love the way it looks. I also had fun picking out a new shower curtain and accent towels on Friday. Can't wait to put them up.

There are still 2 small pieces of tile to install next to the tub. I couldn't install those until I knew how hight the floor would be. Hopefully I'll get that cut on Monday. Tuesday will be a grouting day and by this time next Friday the bathroom should be done.


The finished floor! Please ignore the ugly brown spots. They will soon be covered up with baseboard that will be painted white.

A special thanks to Dave L. for letting me borrow his wet saw. Cutting the tile would have been a major pain without it. Also thanks to Marcel for the use of his truck in hauling my mortar board home. I somehow don't think the Malibu would have worked too well!


Tuesday, March 20, 2007

3 tiles to go...

...until the shower walls are done. Today I stopped off at HD for another big bucket of mortar and got to work. I was able to use the fancy drill bit I got, to drill large holes in the tile for the pipes. It took a lot of time and was quite an arm workout!
Not too much new to report. I finished off the second shower wall and stopped short of the final row on the shower wall with the faucet etc. I needed to drill another hole in a tile, to accomodate the shower head, and I didn't think my neighbors would appreciate all the noise, since many of them have small children.
Tomorrow I should be able to drill the hole, throw the final three tiles up and then get a coat of paint on the walls, hopefully all before Nicole & Makayla join me for dinner.
Now for the pictures...
The second shower wall, completely tiled. I also start putting up painters tape. I'm looking forward to this paint job, as I don't have to worry about the floors, or trimming the baseboard. Since the baseboard will go in last, there is no need to be neat!

So close to being done.


Closeup of what the special ceramic tile drill bit can do. And now for the pugs...


General & Gizmo have really been wondering what on earth is going on upstairs. I came home and immediately got to work...which they were ok with until 6pm (dinner time) rolled around. From that point on, they both sat at the top of the stairs, crying and whimpering, until I took my first break at 7:45 and finally fed them. You'd think they hadn't eaten in days.


A final picture of my furry little guys. They look like they are in jail. They are blocked from the upstairs, thanks to the use of a swinging baby gate.

Now its time for my dinner. Perhaps I should start crying to the dogs and see what they have to say. I think I'll also have another glass of that wine I opened on Sunday...


Sunday, March 18, 2007

The end is in sight!

Wow, where to start. It has been a very productive though tiring week. I really have to hand it to people who do this type of work as a full time job.
Wednesday afternoon I headed to Lowe's and thanks with the help of Marcel and his truck, I bought the proper backer board needed to build up the shower walls. I used a product called DensShield made by GP. It has a built in moisture barrier and is pretty cool. Thursday I installed the two shower walls that didn't involve cutting holes for the piping. Friday, I thought would be a quick and easy job. I would remove the shower handle and tub spout, cut the proper holes in the DensShield and hang it. Well, things didn't quite go to plan. The toughest part wound up being removing the spout. The original spout was a cheap, builders grade one, and the female end of the pipe was glued into the spout. While using my plumbers wrench, the glue gave out, causing the spout to spin round and round, but not come off. I wound up breaking apart the crome plated plastic spout bit by bit, until I could get to the pipe fitting and remove it.
Saturday I attended a HD tiling class...I didn't really learn anything I hadn't already read, but it was useful to see them in action and get to try it out. I returned home and went to work cutting the backer board for the flooring...Geoffrey arrived home shortly and was quite amused and started snapping away.

Cutting a hole for the toilet flange.

The DensShield was installed on top of the first layer of ply-wood subflooring. Between the plywood and DensShield, a layer of mortar was spread to add additional strength. In this picture the floor has not been mortared in place yet.
All of the joints beween the different boards had to be sealed with mortar (not joint compoud) and then embedded with 2" teflon tape. Those walls shouldn't be going anwhere!
After heading to early mass and enjoying a breakfast of Dunkin Donuts, it was back to work. I pried all of the glue away from the baseboard, where the old tile used to be, filled in a large "L" with joint compond next where the old vanity was actually inserted into the wall and then got started tiling! I am using 12" tiles, in Elgon Grey. I liked the tiles (and the price) in the box and LOVE how they look on the wall. The picture just doesn't quite do it justice! I can't wait to finish, paint and get the bathroom back in working order.
Getting closer. Unfortunately I ran out of mortar prior to laying the final row of tile on the 2nd shower wall. It was late in the afternoon and I had no desire to make another run to Home Depot. Tomorrow I'll pick up another batch of pre-mixed mortar (so worth the added cost) and will hopefully finish off the shower walls. Once that is done, I'll paint, install the floor. install a new toilet, new vanity, install baseboards, caulk, seal the grout and call it done. My goal is to have a fully functioning bathroom by the end of March...and I think I'm right on track. That being said, I'm going to go and enjoy a nice glass of wine (or two), grab some dinner and curl up on the couch with the pugs. Geoffrey is out of town this week, so its the perfect opportunity to finish up the bulk of my work.

Sunday, March 11, 2007

Getting closer...

Work was minimal on the bathroom this weekend, although we're getting closer to actually putting down new materials. Katie Craft was in town visiting, and after dropping her off at the airport and taking a power nap, it was time to put on the dust mask and goggles, and head upstairs. Armed with a new 9 gallon shop-vac (old one was 2.5 gal and not as powerful), I was able to pick up 95% of the remaining mortar and remove a majority of the tar paper...finally exposing the subfloor! As the trash can neared its capacity, I had to stop, and will finish up Tuesday (trash day). Hopefully this upcoming weekend I'll be able to start laying the additional subfloor and screwing in the cement board to the floor and shower walls.

Yes, that is actually the plywood subfloor finally showing through! Luckily, its in great condition and will easily support the additional wood and cement board needed to build up the floor to the correct height. Check out the new shop-vac too! I love fun tools :).
The bathtub which was previously filled with mortar is now nice and clean, thanks to the fast work of the new shop-vac.


Sunday, March 4, 2007

Before Picture

For those of you curious as to what the bathroom looked like before...here you go!

There really was nothing wrong with the bathroom, in fact, it was in perfect condition. There isn't a single bit of damage, water or structural...lucky for us! BUT, since the bathroom was dated, and not my favorite color, I decided that the time to do remodel was now, since the bathroom is only used when we have guests. Some may say crazy, but I call it FUN.


Demo is DONE!

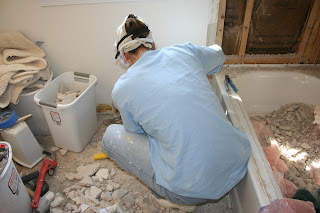
Today I finished up the demo...and now the clean up begins. Earlier in the week I began taking down the mortared shower walls, and finished up that work on Saturday. Today I tackled the floor, which was much easier to remove than I anticipated. Work came to a halt early in the afternoon, when my trash cans reached capacity. Trash pickup will be on Tuesday, so hopefully by Wednesday I will have removed all the large mortar pieces and will pick up the rest with a shop vac. Then its onto installing subfloor and cement board! I'm still having a ball and learning a lot.

The floor "stack up" consisted of plywood subfloor, tar paper, wire mesh and a 1.5" layer of mortar. Using a crowbar and sledge hammer, I would pry away the mortar just above the mesh to avoid damaging the subfloor.
No more mortar shower walls!